I think this semester of Digital Art has been one of my best so far. I am very proud of the body of work I have created over the past few months. One thing I really like is that I have a lot more work to show in this series than semesters in the past. I think this is because I finally found something that I enjoy working on more than anything else I have done before. The hands-on feeling of working with the spray-paint and stencils really gives me more sense of accomplishment and pride in my work than if everything was done solely on a computer.
As far as being ready for finals weeks... That could be a different story. We ran into a slight problem when we were printing my backgrounds. We ran out of canvas, so I'm going to have to (quickly) find an alternate type of paper to print on. All but one of my stencils are cut out (which will take 10 minutes). All I have to do is paint my stencils... I just have to wait on my backgrounds to be printed on something different... Hopefully that decision will be made within an hour of this post, and everything will be printed by this evening so I can get it all done over the weekend.
The end is near, I can see it!! I just need these backgrounds! It is frustrating when you have everything ready to go, you just have to wait for something to be printed. Oh well, I was thrown a curveball when we ran out of canvas, so we'll see how I'll handle it. Hopefully I can hit it out of the park on this one!
Friday, December 3, 2010
Tuesday, November 30, 2010
Cutting it close.
Literally.
Heres the last 4 pieces (I have 5 total. The 5th is the "Star" one you all saw earlier)
I think I'm done with them but suggestions are still welcomed. After the critique, I'll do what editing I can, but I have to get these things submitted to be printed (Along with my backgrounds) so I can cut them out and paint them. And every one of these has multiple layers. Yep, I'm cutting it close.
I struggled with this first one a bit, but this is the outcome:

This is the second, I tried to keep some things in common between each one, to try to tie them together:

And the third. If you look back, I made the flowers on this one A LOT more simple on this one. I realized that the flowers I had before were far too impossible to cut out.


Heres the last 4 pieces (I have 5 total. The 5th is the "Star" one you all saw earlier)
I think I'm done with them but suggestions are still welcomed. After the critique, I'll do what editing I can, but I have to get these things submitted to be printed (Along with my backgrounds) so I can cut them out and paint them. And every one of these has multiple layers. Yep, I'm cutting it close.
I struggled with this first one a bit, but this is the outcome:


This is the fourth. I made this one right before Thanksgiving break... I had spent lot of time on it but compared to my three newest, it just doesn't seem to fit in. I really like the idea.. and I think it is my favorite out of all of them, but it just doesn't seem to fit. It doesn't have the elements of the other ones... so I'm not sure what to do about that...

And remember, all of these will be sprayed on the patterned backgrounds that you all saw in class, and will have a black border, so don't mind how some of the edges are. They will most likely be covered up.
So I think that covers most of it... I still have a bunch of work to do, but I guess I'm all done on-screen! (Unless you guys rip my ideas to shreds and have a lot for me to fix!)
Friday, November 19, 2010
Progress
I'm just going to keep doing what I've been doing... Printing, cutting, and painting. I think I'm done with one, and another is in progress. I just have to get the last three printed and I'll be good to go.
Print - cut - paint.
That's what I've been doing, and that's what I'm going to keep doing.
Print - cut - paint.
That's what I've been doing, and that's what I'm going to keep doing.
Friday, November 5, 2010
Inspiring?
I've noticed a few small "tags" throughout campus lately. Someone has been spray-painting their name (or something else, I can't read it) on the rocks throughout campus. No, its not some fraternity or sorority, because it appears to have deliberately placed on top of their brightly colored 'works of art' to deface them. I think I've also seen this same tag n the back door of Kettering. It has since been painted over.
Legal? Probably not.
Inspiring? I think so.
Now I want to go and stencil all of the rocks around campus with a smaller version of my "Art is Power" stencil. Sounds like an adventure!
Legal? Probably not.
Inspiring? I think so.
Now I want to go and stencil all of the rocks around campus with a smaller version of my "Art is Power" stencil. Sounds like an adventure!
Friday, October 29, 2010
Progress
Right now I am in the process of stretching the four canvas backgrounds that I had printed earlier in the week. I'm waiting on my "Art Is Power" stencil to be printed so I can cut it and stencil it. I'm finally getting some progress off screen, and I'm excited to be starting the hands on part of this project.
Monday, October 25, 2010


Friday, October 22, 2010
Inspirational Artists
Probably one of my biggest influences in my current body of work has to be Banksy. (www.banksy.co.uk/)
He is a stencil/graffiti street artist, painter, and a political activist. I find it amazing that no one knows who this guy is, and when and where his artwork will appear next. That mystery really intrigues me. Not only that, but the style he uses, along with the political messages hidden in every image, sparked my interest. From the very first image I saw of his, i've been hooked. Hooked enough to try something like this myself.
Peat Wollager (http://www.stensoul.com/) is another stencil artist that has grabbed my attention recently. He pays more attention to detail than Banksy would. (Heck, Banksy's stencils have to be simple, he pretty much has to stencil on the run to avoid being caught.) Rather than painting on the street, he paints artwork that can be transported (His artwork can be displayed in galleries.) He focuses more on multi-layed stencils. The use of multiple stencils allows you to use more colors and add more detail into the pieces. Although he does not paint political propaganda, he artwork is still interesting. It is more "fine-art" stenciling.
Wednesday, October 20, 2010
Photography show
My favorite pieces of the show were those done by Casey Waters. I was very interested in the daguerreotypes, especially the process in which they were created. The first thing I thought was, "Wow, how did they do that??"
"Description: The daguerreotype image is formed directly on a silver plated copper plate which was made light sensitive with a surface coating of iodine vapors. It is a direct-positive process, made without a negative. It has a highly reflective surface that sometimes makes it difficult to see the image. (Source: http://www.loc.gov/rr/print/coll/589_daguerre.html)"
It was a really neat effect, and it makes me wish I had the materials to try it myself. The size was nice too, you had to get up close and personal, and stand at the right angle to see the image. Overall, those images sparked my interest the most. I thought they were presented very well.
Friday, September 17, 2010
More progress
Well I've made a lot of progress on the first piece that I showed in the last critique. I have the background done, as well as the"stencil" parts. Pretty much all I have to do is separate the layers into different files to print. Then I can cut them out and spray it. I've also started work on a new background for a second piece... And that's where I'm at thus far.
I was also wondering if I should change my color scheme up a bit. Instead of sticking to red black and white, should I try other colors too? Or do you think having them all the same color would help tie them together? Opinions?
I was also wondering if I should change my color scheme up a bit. Instead of sticking to red black and white, should I try other colors too? Or do you think having them all the same color would help tie them together? Opinions?
Friday, September 10, 2010
Early Stages
As you know, I've shifted completely away from the globe idea that I worked with last year, and have moved onto the idea of stenciled political propaganda posters, meshed with some mixed media. For more info on that, check out some of my previous posts. Here is the progress of the one I've started:
The background thus far:
 Part of one of the 2-layer stencils, (WIP):

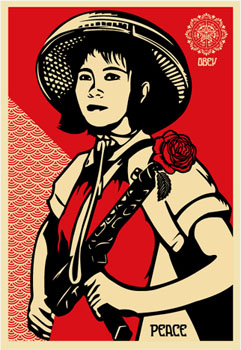
Here is some of my inspiration:
OBEY - "Worldwide Propaganda Delivery"
http://obeygiant.com/archives

I even have some inspiration from Banksy:
http://www.banksy.co.uk/
His images are too large to link to, so check out his website and take a look at some of his stencils. There's some pretty funny stuff there.
The background thus far:


Here is some of my inspiration:
OBEY - "Worldwide Propaganda Delivery"
http://obeygiant.com/archives
I even have some inspiration from Banksy:
http://www.banksy.co.uk/
His images are too large to link to, so check out his website and take a look at some of his stencils. There's some pretty funny stuff there.
Saturday, September 4, 2010
This is where I'm at...
So I think I'm going to go along with the stencil idea that I mentioned in previous posts. What I plan to do is combine digital prints with mixed media.
I see a final piece looking something like this: A background designed in Photoshop, printed out, and then stenciled on. The stencil(s) would also be designed in Photoshop, printed out, and then cut out, and then spray-painted over... The plan is to have something that looks like an underground political propaganda poster (with that being the theme of each one.)
Well, at least, that's the plan for now...
Monday, August 30, 2010
I'm stuck.
Okay, I know what I want to do, but I'm not sure how I want to go about it... I want to do stencils (I just realized that that term sounds, er... elementary), but I'm not quite sure how I can incorporate the "computer art" aspect of it. Computer design is definitely involved, because that's where the stencils are made before they are cut out. But when I think of computer art, I think of digital prints... Since this IS a computer art class, I need to figure out how I can mesh the two together... maybe mixed media? Stencils on top of a digital print? Any ideas?
You never know...
You never know where some of your artwork will end up...
Last semester in my 3D class, I made a life size replica of me, running over a hurdle, completely out of coat hangers. It was a final project, and far too big and bulky for me to take with me at the end of the year. So I just left it for anyone to do what they want with it. I expected it to go in the trash, but it turns out, a former AU graduate and now art teacher at Edison Elementary School, took the piece, and now has it on display there. Or so I heard, he took half of it.
He took the wire replica of me, and left the hurdle, and I guess it's hanging on a wall somewhere sitting in a La-Z-boy recliner. I (and when I say I, I'm referring to the life-size replica of me made out of coat hangers) went from being an agile athlete to being a bum in a recliner. And I thank that's awesome :)
Friday, August 27, 2010
First Post of the Semester
Hmm... all work ideas / inspirations for the semester...
Well I know I'm going to be going in the same direction I did last year. That means I'll be doing the whole "globe" thing. If you're new to the class, you can take a look at my previous posts from last semester to get an pretty good idea of what I man. But now that I have the technical process down, I'll be able to do more of the urban grunge manipulation to them (This was my original goal for last year.)
Also, over the summer I really got into stencils. You know, the Banksy-style spray painted stencils... Over the summer I did a few and really enjoyed it. Too bad this is a computer art class, otherwise I'd be doing something like that instead :)
Anyone have any ideas on how I could incorporate the two maybe? Street-art stencils and computer art? Just a thought...
Monday, April 19, 2010
Some of my favorites
In addition to the ones previously posted, here are a few more examples of (a few of my more successful) "globes" I have done. Remember these are just the panorama's warped into the globes, no touching up the 'vortexes' in the middle, no cropping, etc...


The scrap-yard didn't work out, apparently, thy had some 'incident' earlier in the week and refused to let anyone who didn't work there in...
In my junior review, we all agreed that the focus of this body of work is the technique, which is hindering me at the moment from tackling the whole "urban grunge" transformation... What do you guys think? Go with that or just have mass amounts of these (not 'grunged up') "globes," and work on they way I would present them... Input is appreciated :)
On a side not, I just thought I'd add how much computer resources theses massive guys take up... at full resolution the panoramas are over 30ft long, meaning these are 30ft globes... It takes me a good 15 minutes each for these things to re-size to just half that... (remember these are 20 full-resolution photographs put together) Even flattened into 1 layer, cut down to about 6ftx6ft, editing these things are just a pain and honestly take way longer than it should...

-Out apartments in South Carolina

-Beach Patio in South Carolina

-Holiday Lakes

-Holiday Lakes Rocks & Docks

-Field House construction from North end of track (forgot to crop the sky in the panorama, easy fix.)
The scrap-yard didn't work out, apparently, thy had some 'incident' earlier in the week and refused to let anyone who didn't work there in...
In my junior review, we all agreed that the focus of this body of work is the technique, which is hindering me at the moment from tackling the whole "urban grunge" transformation... What do you guys think? Go with that or just have mass amounts of these (not 'grunged up') "globes," and work on they way I would present them... Input is appreciated :)
On a side not, I just thought I'd add how much computer resources theses massive guys take up... at full resolution the panoramas are over 30ft long, meaning these are 30ft globes... It takes me a good 15 minutes each for these things to re-size to just half that... (remember these are 20 full-resolution photographs put together) Even flattened into 1 layer, cut down to about 6ftx6ft, editing these things are just a pain and honestly take way longer than it should...
Monday, April 12, 2010
Display idea
Ever heard of the artist Julian Beever? He is most famous for his perspective sidewalk-chalk artwork. He skews his artwork in such a way, that only from viewing the work at a certain angle will the artwork look right. Not only does it look right, but from the right angle it actually looks like the artwork is 3-dimensional! Have a look:

 -or-
-or-


The process:
How to do 3D Anamorphic Artwork and Sidewalk, Street, and Driveway Art - More DIY How To Projects
I'm going to try a small scale test (8"x8" possibly) and see how it works, I'll post a picture when its all said and done.
Questions, comments, concerns, ideas?
These 4 images are property of Julian Beever
This gave me and idea... I can skew my images in such a way, that they will look like they are popping out of the wall if you stand in the right spot. Sure, my globes have perspective and look 3D... but they are still just a flat circle on a page. But I think I found a way to re-create this perspective. Hopefully, if done correctly, I can make it look like my (flat circle) globes are actual GLOBES stuck onto the wall... does that make sense?The process:
How to do 3D Anamorphic Artwork and Sidewalk, Street, and Driveway Art - More DIY How To Projects
I'm going to try a small scale test (8"x8" possibly) and see how it works, I'll post a picture when its all said and done.
Questions, comments, concerns, ideas?
Wednesday, March 31, 2010
Dang you auto-exposure!
Went out and took 2 new panoramas today; one of the construction of the new field house and one taken from mid-field on the new soccer/track complex. Come to find out when I get back that I had auto-exposure turned on (not what you want to do) so the brightness/contrast of every picture came out differently... so I have 4 options:
Try to fix them all myself, start over and take the pictures again, throw these panoramas out completely, or just leave them how they are.
Here is the one I took for mid-field at the new track: (you can see what I mean about the auto-exposure messing things up)

Only 20 pictures in this one, (10 low-level, 10 eye-level) I left 10 of the sky that I usually take out, that's why the horizon line seems slim. I didn't bother to fix the "vortex" in the middle yet either... Oh well, I learn something every time. At least I have another long weekend ahead of me where I can get some things done.
Monday, March 1, 2010
Four More Days
Four more days, and then I'll be on spring break. In four more days, I can finally crack down on this photography I so desperately need to finish. I will finally have a week where I don't have classes or practice to go to, or school work to worry about. Heck, I won't have to worry about being stuck in a parking lot covered in 5 feet of snow either.
I've got a few places in Mansfield that I plan on taking pictures for my panoramas first. Those are the closest places to where I live, so that's where I'll start. I've also been informed about an old shipyard in Sandusky that is high on my list.
I've had enough practice on the process, so once I bang out and get these pictures done, I'll be hitting the ground running. So be prepared for A LOT more progress once the weekend comes!
Monday, February 22, 2010
Some progress...
I'll update this post in a few, stay tuned.
After small adjustments:
After the crop and some slight changes...
After small adjustments:

After the crop and some slight changes...

Wednesday, February 17, 2010
Trial Run
If you read my last post, you would know the difficulties I've been having with the weather... I finally had a group of 4 or 5 people help me dig out my car one evening, and the next day I drove outside of town looking for anything to photograph. I wasn't able to make it out to any big cities due to the weather, however I did end up stopping right down the road from Crestview high school. I set up shop in the middle of a field and went to work. 25 minutes later, I had a memory card full of pictures. I had what I came for, and I couldn't feel my feet, so I headed back. Later I stitched the pieces together, touched up some places, and I was left with this panorama: Now onto the next step, making the globe. Using a few tricks I ended up with this:
 After doing this, I realized there were some faults (obviously) after the transformation. Even though this is a trial (by trial, I mean it is not the "urban/grunge" look I plan to base my work around) to make sure my process is correct.
Two main faults:
-Trees. This is a result of me being dumb during the photography process. Note to self: DO NOT cut off trees/buildings etc. (You can see why in my image above) I suppose this means I try to recreate the tops of the trees that were cut off, or re-photograph it again... I wont do that because this is a trial, but maybe next time I'll make two passes: one pass at eye level, and another with the camera pointed at an upward angle to catch the tops of the trees. Unfortunately that means I'll have twice as many pictures to take, and twice as many pictures to stitch together...
-The "vortex" at the center of the planet. Another photography fault of mine. I didn't realize this would happen, but if you think about it; it should. I didn't take a picture of the center, I took a picture AROUND the center. Another note to self: Next time, take a picture of where the tripod sat before/after I take all of the pictures, so I can blend it in over the "vortex."
Sorry for the long-winded post, but that's where I'm at. Still learning but, still at it.
 Now onto the next step, making the globe. Using a few tricks I ended up with this:
 After doing this, I realized there were some faults (obviously) after the transformation. Even though this is a trial (by trial, I mean it is not the "urban/grunge" look I plan to base my work around) to make sure my process is correct.
Two main faults:
-Trees. This is a result of me being dumb during the photography process. Note to self: DO NOT cut off trees/buildings etc. (You can see why in my image above) I suppose this means I try to recreate the tops of the trees that were cut off, or re-photograph it again... I wont do that because this is a trial, but maybe next time I'll make two passes: one pass at eye level, and another with the camera pointed at an upward angle to catch the tops of the trees. Unfortunately that means I'll have twice as many pictures to take, and twice as many pictures to stitch together...
-The "vortex" at the center of the planet. Another photography fault of mine. I didn't realize this would happen, but if you think about it; it should. I didn't take a picture of the center, I took a picture AROUND the center. Another note to self: Next time, take a picture of where the tripod sat before/after I take all of the pictures, so I can blend it in over the "vortex."
Sorry for the long-winded post, but that's where I'm at. Still learning but, still at it.
Monday, February 8, 2010
Snow causing problems....
The resent snow is causing problems in more ways than one....
Since today is the first day in a long time that I don't have track practice, I'd figure I would have plenty of time to go out for a drive and take some of the pictures that I needed. Literally 15 minutes ago, I walked out to my car, to find my car buried under a pile of snow taller than me. Aren't the plows supposed to clear the way, and NOT block everyone in the parking lot in?? Seriously, how and I going to get my tiny little For Mustang sports car through/over/around 4 tons of snow??
So it looks like I'll have to see what I can get pictures of that is within walking distance...
But here's another problem: Everything I would take a picture of is covered in feet of piled snow! That wouldn't yield very interesting results, because all of the details will be covered up. Not to mention the intense white glare/reflection of the sun.... I mean a panorama won't be very visually interesting when all you see is white everywhere...
I guess all I can do right now is plan more spots to photograph and perfect the technique of making a "globe panorama"??
Monday, February 1, 2010
Scratch that last idea... kind of?
This weekend was a time of inspiration. I've decided to stray away a little from my idea of editing a static photograph. Instead, I've decided I want to manipulate and edit a panorama. (Click here to read more on what a panorama is, if you're not already familiar with that.) My idea of the urban grunge theme will stay the same, however. To go further with this idea, I want to manipulate the panorama into something that is called a "globe panorama."
Example of a globe panorama here:

Clearwater Beach Planet by dgroup
Basically, the process to make something like this would be:
-Use a tripod and take a series of photos in a 360degree motion of the scene
-Stitch the photos together to make a panorama
-Warp the panorama 360degrees into a circle
From there I'll go into the "globe panorama" and manipulate/edit it to my liking using the urban grunge/destroy theme.
I'm practicing the process now, I'll upload the panorama I did of the Quad later sometime.
Really all I need to do now is take the photos so I can get down to editing. Any ideas on some interesting places that would have some structures that would make a good panorama? The idea is to have each image bllok like its own "separate world."
Example of a globe panorama here:
Clearwater Beach Planet by dgroup
-Use a tripod and take a series of photos in a 360degree motion of the scene
-Stitch the photos together to make a panorama
-Warp the panorama 360degrees into a circle
From there I'll go into the "globe panorama" and manipulate/edit it to my liking using the urban grunge/destroy theme.
I'm practicing the process now, I'll upload the panorama I did of the Quad later sometime.
Really all I need to do now is take the photos so I can get down to editing. Any ideas on some interesting places that would have some structures that would make a good panorama? The idea is to have each image bllok like its own "separate world."
Monday, January 25, 2010
New Found Inspiration
While browsing for new ideas and techniques, I stumbled upon a digital artist by the name of Vitaly S. Alexius. (http://www.svitart.com/)
Alexius does a lot of photo manipulation using themes and ideas that are very similar to those that I would like to work with (Urban, grunge). He then continues to further develop his pieces by digitally "painting" over them. This produces some interesting results.
I myself own a Wacom pen tablet, and I would love to experiment with this technique more. Although my digital painting skills are far from great, I'd still like to give it a shot. After comparing images with just straight photo manipulation with photo manipulations that were then further developed using this "painting" technique, the "painted" ones were far more interesting.
Here are some of Alexius' works to show you what I mean.
Absence of Vision by =alexiuss on deviantART
Aeons of Eclipse by =alexiuss on deviantART
Pretty cool, eh?
Wednesday, January 20, 2010
First post of the semester!
Well this looks like a good time to make my first post, and to describe what my (tentative) plans are for this semester.
I am very interested in photo manipulation. More specifically, taking various scenes that have nothing to do with each other and combining parts of each scene to make a whole new, more interesting -- yet artistic-- scene.
I'm at the point right now where I'm brainstorming some concepts and doing research on different techniques. Throughout this process I'm trying to keep in mind what kind of photos I could take to give me a good base to start on when I'm all set on a concept. I plan on making a series of works (I am not sure about how many in the series yet), all with a common theme. However, I am really drawn to urban and technology-based themes.
So far I think I have a good idea of what I want to do, now it just comes down to getting things done. So this is where I'm at.
Subscribe to:
Posts (Atom)